Setting the correct white balance on a digital camera for underwater photography is far from straightforward. However, a number of approaches may be tried.
-
 Set the white balance for normal sunny daylight conditions and make adjustments to all the images later. This approach is likely to produce images that are much too blue, but which may be corrected when shot in RAW mode. This is not a very satisfactory method.
 - Set the white balance to the standard underwater setting, assuming the camera has one, and make further adjustments to images after the dive. Underwater white balance settings are usually in the region of 3,200K, and sometimes produce reasonably satisfactory results. However, whatever value the setting represents, it is just an average figure for typical circumstances and cannot be ideal for all conditions.
- Carry a waterproof standard white card and photograph it underwater, using the custom white balance setting, in the location and lighting to be used. Images can then be corrected in Photoshop. This is a good theoretical approach but leaves much to be desired from a practical point of view. Every shot is likely to be taken in slightly different circumstances. The distance below the surface may change, the lighting may change, and it is not possible to have the subject remain motionless while a diver photographs a white card. The technique nevertheless works for serious photographers and can be used when shooting in RAW or JPEG format and with cameras which do not have a standard underwater white balance setting.
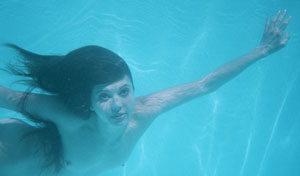
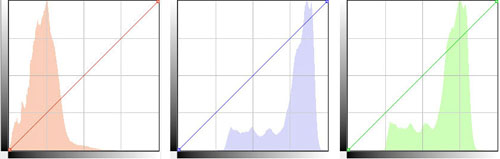 Once the best images have been created underwater, the next task is to adjust them to remove as much as possible of any unwanted colour cast. The first step is to understand the nature of the problem. The image of the girl above has not been adjusted in any way - it is reproduced exactly as recorded by the camera and shows a distinct and unacceptable blue cast. The three images to the left show the histograms for the red, green and blue channels for this original image. The histogram for the red channel is cropped to a small extent on the left-hand side, and peaks well to the left in the darker tones. The blue and green histograms both peak well to the right in the lighter tones. Ideally, the histograms for all three channels should occupy broadly the same region on the horizontal axes. This would produce a much better colour balance in the image.
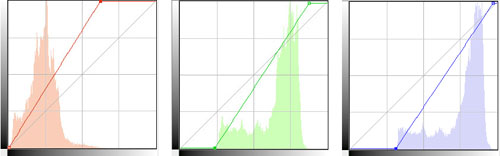 A simple process of initial adjustment can be used to correct much of this imbalance. First, open the image in Photoshop and use Curves to select the red channel. Then slide the white point (at top right of the histogram window) to the left until it is set close to the right-hand end of the histogram as shown below. The black point (at lower left of the histogram window) cannot be adjusted in this case because the histogram is already cropped to some extent. Then select the green channel and once again adjust the white point to the right-hand end of the histogram as shown above. The black point can also be adjusted by sliding the control to the left-hand end of the histogram - also as shown below. Finally, repeat the process for the blue channel.
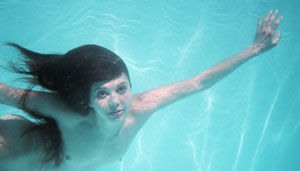
Once these basic adjustments are completed, the image should exhibit a more balanced appearance. However, such basic changes do not represent a cure-all for every image. Further smaller adjustments can be made using Curves to achieve better contrast and fine changes of colour balance. In the case of the image used in this example, the colour balance after adjustment of the three channels can be seen in the picture to the left. A small final adjustment was made to colour balance to achieve accurate skin tones. The swimmer was relatively sunburned so the red was allowed to remain apparent on her upper shoulders and arms. A small increase in contrast then gave the image a somewhat sharper and more crisp feeling.