


Photographic studio lighting is an art-form in its own right. Basic lighting setups are relatively straightforward but may produce unexceptional images when used by those with little experience. However, they offer the best starting point for photographers wishing to acquire studio experience.
There is simply no substitute for an understanding of how light behaves. A combination of practical and theoretical knowledge of lighting set-ups provides an excellent foundation upon which to build studio experience. Perhaps the first principle which should be understood is that of the inverse square law. This states a very simple relationship between the intensity of illumination and the distance between a light source and a subject.
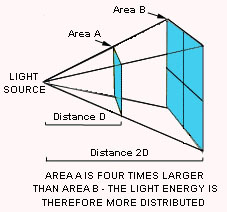 The amount of light reaching a subject decreases as the distance between the light source and the subject increases - hence the inverse relationship. If the distance between source and subject is doubled, the height and width of the area illuminated both double. The illuminated area is therefore increased by a factor or four, and the intensity of illumination decreases to one quarter of its former level - hence the second-order, or square, relationship. Doubling the distance between source and subject therefore implies an increase in exposure of two stops. This is true for umbrellas, softboxes and other diffused light sources.
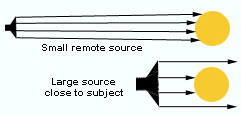 The physical size of a light source is also significant. Sources that are large when compared to the subject provide softer and more flattering lighting. This is because the light from a large source wraps around a subject rather than creating harsh and noticeable shadows. This effect is known as the depth of the lighting. The best illustration of the effect may is found outdoors. On a sunny day the sun is effectively a point source and therefore casts deep shadows in areas that is cannot reach. Contrast is consequently high. However, on an overcast day, the sky is uniformly illuminated and becomes the largest softbox in the world. Light is uniform, shadows are diffused and contrast is low. Consequently, when photographing a human subject in a studio, the softbox should ideally be at least two metres in height. It should also be kept close to the subject. When photographing a small object, a similar effect can be achieved with a much smaller source.
 Another basic consideration is the incident angle of the light source. The amount of light reflected back from a face depends upon the angle it presents to the light source and the camera.A face therefore becomes darker and cooler in tone as its surface curves away from the light, the angle of incidence increases and less light is returned.Indeed, as the source moves round from a subject's cheeks towards their ears, the reflected light falls off rapidly. One full stop is lost between 45° and 60°, and full three stops are lost between 45° and 80°.The quantity of light returned to the camera is dependent upon the nature and angle of the reflecting surface.
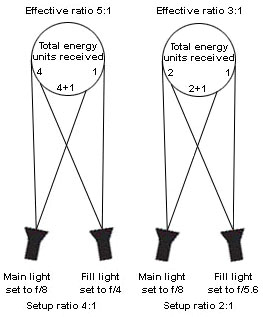
A final consideration is lighting ratio, or the comparative illumination provided by multiple flash-heads. If the main light source is set to give double the illumination of a fill light, or one stop higher, it would be easy to assume that a 2 :1 lighting ratio had been set up. However, that is not the case. The fill light also illuminates most of the area already lit by the main source, so the total illumination will is the sum of the two. Areas lit only by the broader fill light receive only the lower level of illumination from the single source, so the actual lighting ratio is 3 :1 rather than 2 :1. If the output of the main light is increased by a further stop, the working ratio becomes 5 :1. The lighting ratio must be determined by choice and experience. For low key applications a ratio of 5 :1 is a good starting point, but an even higher ratio could be used. For atmospheric room photography the ratio can also be high. Start with the fill light at 1/4 of the output of the main light, which might be a window - ie two stops down giving a ratio of 5 :1.
Photographers who are able to light subjects effectively by simply looking at the subject are skilled and subtle observers of light. Most people find that it is necessary to make numerous measurements using a flash-meter and a bit of experimentation which should be completed prior to the arrival of the model. Although there are many approaches to setting up studio lighting, basic guidelines are as follows:
- Proceeding in a logical order, measure the output from each flash-head with all the others turned off. Think in terms of stops.
- Point a flash-meter towards each light from the subject's location and precise distance. When the principal light source is very close to the subject, the thickness of the flash-meter may be a significant proportion of the working distance. Ensure that no light is blocked by your body while taking measurements.
- Consider not only the strength of the light but also the tone of the backdrop. An under-lit white backdrop can be made to look dark grey, and conversely an over-lit black background can be rendered relatively light.
- The lens aperture must be determined from a light measurement taken with all flash-heads firing. This controls the amount of light reaching the film or sensor. The shutter speed determine to what extent ambient light is to be allowed influence the image.
- Make notes so that a setup can be repeated. Numerous blank copies of a suitable form make this process much easier.